
Juicy Corn on the Cob Recipe for Simple Summer Sides
This Juicy Corn on the Cob Recipe gives you sweet, buttery kernels with a satisfying bite that works perfectly for summer meals, BBQ spreads, or quick weekday sides. You’ll learn how to turn simple corn into something deeply flavorful without complicated steps or equipment.
Timing
- Prep Time: 10 minutes
- Cook Time: 10–15 minutes
- Total Time: 20–25 minutes
- Servings: 4 ears of corn (2–4 people depending on appetite)
Ingredients for Corn on the Cob Recipe
Fresh Corn Base
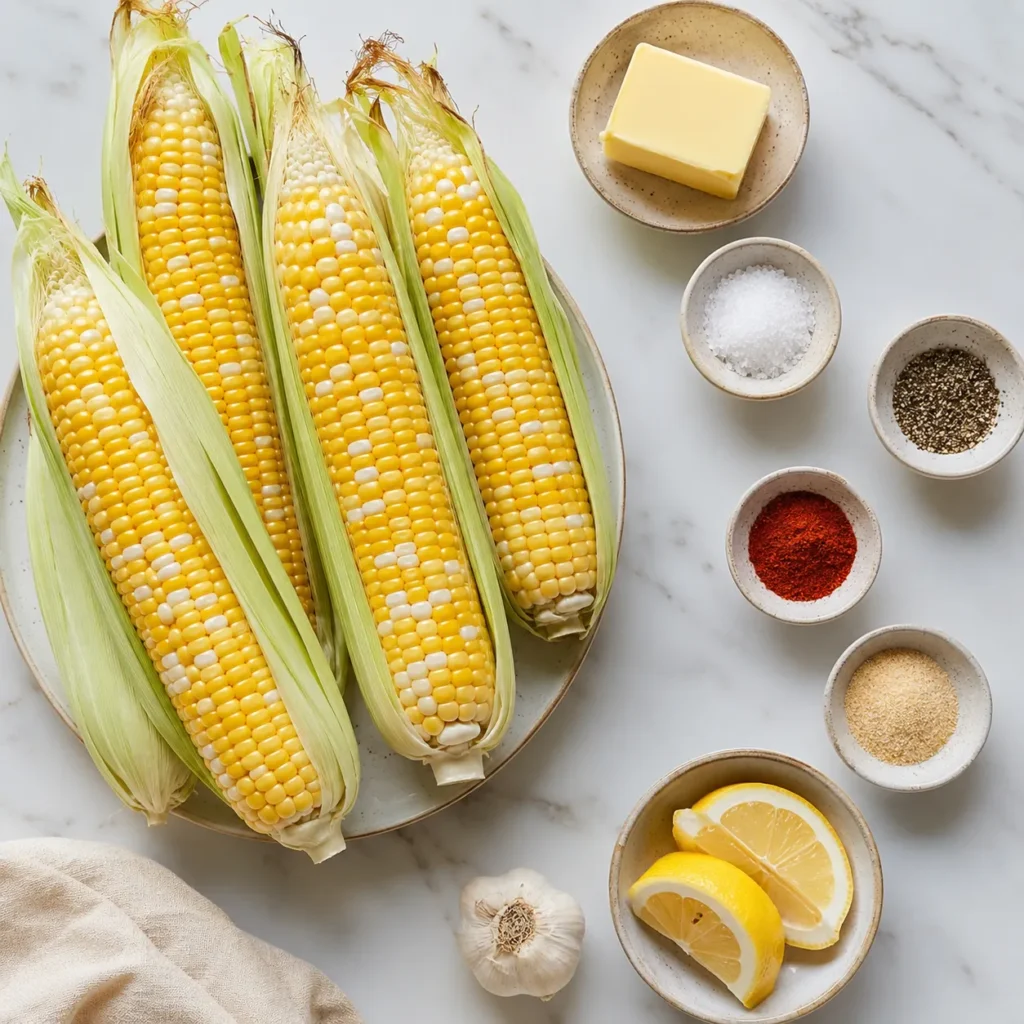
- 4 ears of fresh corn on the cob, husks removed and silk cleaned
- Water for boiling (enough to fully submerge corn)
Flavor Enhancers
- 2 tablespoons salt (for boiling water)
- 2 tablespoons unsalted butter (softened for finishing)
- 1 teaspoon black pepper (freshly ground for best flavor)
Optional Flavor Boosts
- 1 teaspoon paprika for mild smokiness
- 1 teaspoon garlic powder for depth
- 1 tablespoon lemon juice for brightness
- Fresh chopped parsley for garnish
Step-by-Step Instructions
Step 1: Clean and Prepare the Corn
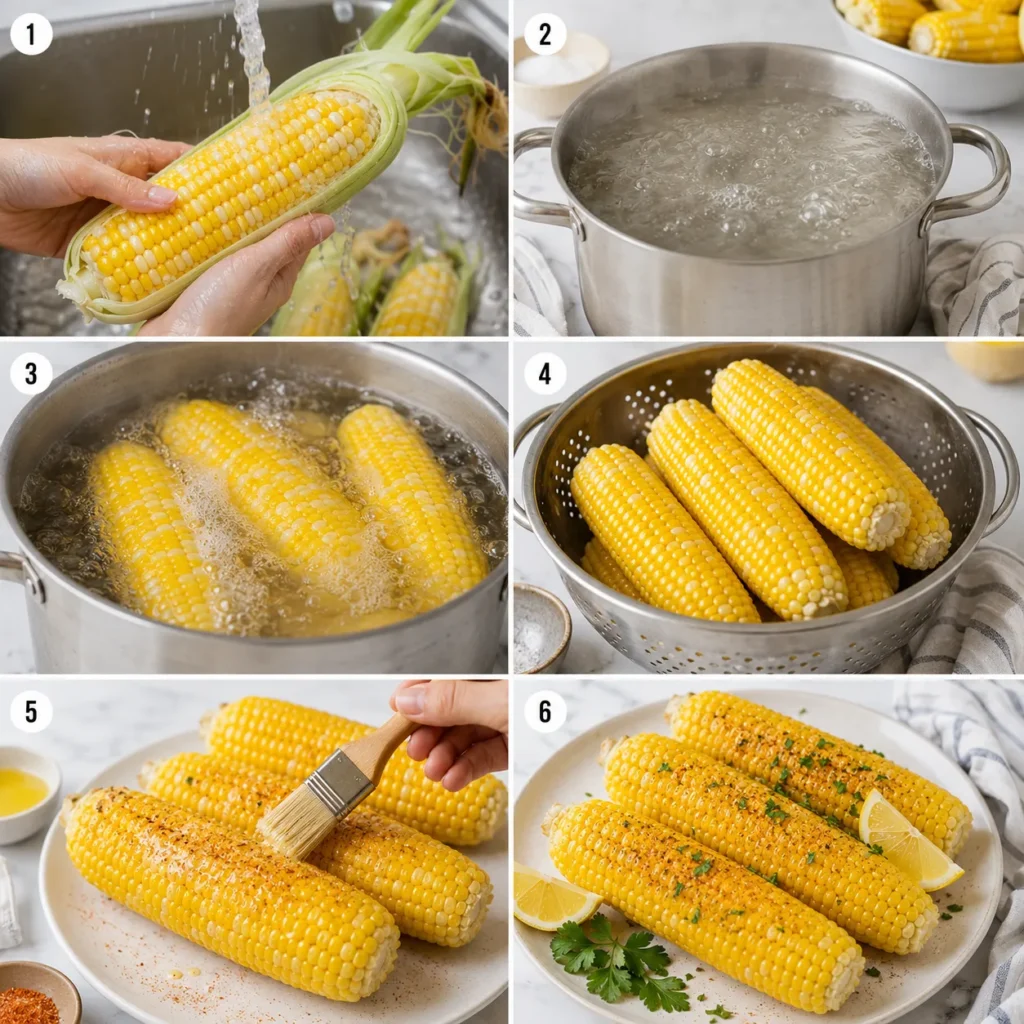
You start by removing husks and silk from each ear of corn, then rinsing them under cool water for about 2–3 minutes. This ensures you get clean, smooth kernels without any fibrous strands interfering with texture.
Chef’s Tip: Take your time removing silk completely because leftover strands can cling to kernels after cooking and affect both presentation and mouthfeel.
Step 2: Bring the Water to a Proper Boil
Fill a large pot with enough water to fully submerge the corn, then add salt and bring it to a steady boil over high heat for about 5–7 minutes. The salted water helps season the corn from the inside while it cooks.
Chef’s Tip: Always wait until the water reaches a full rolling boil before adding corn, because starting in cold or lukewarm water can lead to uneven cooking and less sweetness.
Step 3: Cook the Corn Until Tender
Carefully place the corn into the boiling water and cook for 8–10 minutes. You’ll notice the kernels turning brighter yellow and slightly plumper, which means the natural sugars are locking in.
Chef’s Tip: Avoid overcooking the corn because extended boiling can break down the natural sugars and make the kernels slightly chewy instead of juicy.
Step 4: Drain and Rest the Corn
Once cooked, remove the corn using tongs and let it drain in a colander for 1–2 minutes. This short resting period allows excess water to evaporate so the butter coating sticks better.
Chef’s Tip: Letting the corn sit briefly before seasoning prevents dilution of flavor and ensures every bite carries a rich, buttery finish.
Step 5: Butter and Season While Warm
While the corn is still hot, brush each ear generously with softened butter and sprinkle black pepper evenly. If you’re using optional spices like paprika or garlic powder, add them at this stage for better absorption.
Chef’s Tip: Seasoning the corn while it’s warm helps the butter melt instantly, allowing the flavors to coat every kernel more evenly.
Step 6: Add Finishing Touches
For extra brightness, squeeze a small amount of lemon juice over the corn and sprinkle fresh parsley if desired. This step balances richness with a light, fresh contrast.
Chef’s Tip: Use lemon sparingly because too much acidity can overpower the natural sweetness of the corn.
Nutritional Information (Per Serving)
| Nutrient | Amount |
| Calories | 180 kcal |
| Protein | 5 g |
| Carbohydrates | 28 g |
| Total Fat | 7 g |
| Fiber | 3.5 g |
| Sodium | 320 mg |
| Sugar | 6 g |
Why You’ll Love This Recipe
- You get naturally sweet and juicy corn that highlights its own flavor without heavy seasoning, making it a clean and satisfying side dish.
- The cooking method is simple enough for beginners, yet reliable enough to produce consistent results every time you make it.
- It pairs beautifully with grilled meats, salads, or sandwiches, making it a versatile addition to almost any meal.
- The recipe is flexible, allowing you to adjust spices, butter, or toppings based on your personal taste.
- It uses minimal ingredients, which means you can prepare it quickly without needing special pantry items.
Common Mistakes to Avoid
- Overcooking the corn is one of the most common issues, and it usually happens when people leave it in boiling water for too long, leading to rubbery kernels instead of juicy bites.
- Adding corn before the water fully boils can cause uneven cooking, so always wait for a strong rolling boil before placing it in the pot.
- Skipping the salt in boiling water reduces flavor absorption, leaving the corn tasting flat instead of naturally enhanced.
- Not drying the corn slightly after boiling can prevent butter and seasoning from sticking properly, resulting in uneven flavor distribution.
- Using cold butter instead of softened butter makes it harder to coat the corn evenly, reducing the richness of each bite.
Serving Suggestions
- Serve it alongside grilled chicken, steak, or kebabs to create a complete BBQ-style meal with balanced textures and flavors.
- Slice the kernels off the cob and add them to salads or rice bowls for a sweet crunch that enhances the dish.
- Sprinkle with chili flakes and cheese for a street-style corn variation that feels bold and satisfying.
- Pair it with roasted vegetables or light soups for a comforting yet simple vegetarian meal combination.

Healthier Alternatives and Ingredient Swaps
- Replace butter with olive oil if you want a lighter, heart-healthy version that still delivers smooth richness.
- Use reduced-sodium salt in the boiling water to lower overall sodium intake without losing seasoning depth.
- Add nutritional yeast instead of cheese-based toppings for a dairy-free, savory flavor boost.
- Skip butter entirely and rely on herbs like parsley, coriander, or basil for a fresher, cleaner taste profile.
- Use air fryer finishing instead of boiling if you want a lower-water cooking method that intensifies natural sweetness.
Storage and Meal Prep Tips
- Store leftover corn in an airtight container in the refrigerator for up to 3 days to maintain freshness and texture.
- Reheat in a steamer or microwave with a damp paper towel to restore moisture without drying out the kernels.
- If prepping ahead, boil the corn and store it unseasoned, then add butter and spices just before serving for best flavor.
- Avoid freezing cooked corn for long periods, as it can affect texture and reduce the juicy bite you expect.
Conclusion
This Juicy Corn on the Cob Recipe proves that simple ingredients can deliver incredible flavor when handled correctly. With the right timing, seasoning, and technique, you’ll consistently get sweet, buttery corn that works for any meal. Once you master it, you can easily customize it to match your taste and seasonal ingredients.